Menu

Show posts

This section allows you to view all posts made by this member. Note that you can only see posts made in areas you currently have access to.

Show posts Menu

Topics - yorkshirespud

#1
General Banter / AACI defunct?
September 09, 2008, 08:24:44 AM
I almost dare not ask this, as I'm dimly aware there's a lot of politics in the yank scene that I always completely ignore as I couldn't give a monkeys about that sort of nonsense, but ...

I've not been on the forums for a while in the last few months as I've been stupid busy with work, and I seem to gravitate towards mkb and american chevy forums these days, but I've just noticed that (probably the last person to notice for weeks no doubt), that http://www.aacint.com/forum\" target=\"_blank\" rel=\"nofollow\">http://www.aacint.com/forum is deaded, and an alleged replacement http://www.aac-int.com/\" target=\"_blank\" rel=\"nofollow\">http://www.aac-int.com/ is no better either.

Has the aaci finally gone into meltdown or something?

Nick
#2
Hi all, I've just got hold of some 18" alloys to replace the 17s on my XJR from ebay, it's a common mod to the 6 cylinder XJR I have to put alloys from a newer V8 XJR on to give a slightly more modern look. They're the same width (255), and just have a 40 section instead of a 45 to retain the same rolling raduis:

http://cgi.ebay.co.uk/ws/eBayISAPI.dll?ViewItem&rd=1&item=280262433589\" target=\"_blank\" rel=\"nofollow\">http://cgi.ebay.co.uk/ws/eBayISAPI.dll?ViewItem&rd=1&item=280262433589

They're actually very good, with hardly any lifting of the lacquer, but there is a tiny bit. Picked them up last night, and to be fair to the bloke they're exactly as described. I do have half a mind to have them refurbed if it's possible and not too expensive though before I shell out for new rubber, does anyone have any advice or recommenations?
#3
General Banter / Indulged my inner chav ...
July 28, 2008, 08:47:44 AM
... by immediately hopping up my new daily, the XJR!

It occured to me that I couldn't possibly own an entirely stock vehicle, so I have abused my freshly serviced Jag by replacing the crankshaft pulley with a slightly larger one:

http://cgi.ebay.co.uk/ws/eBayISAPI.dll?ViewItem&rd=1&item=150060833883\" target=\"_blank\" rel=\"nofollow\">http://cgi.ebay.co.uk/ws/eBayISAPI.dll?ViewItem&rd=1&item=150060833883

which effectively overclocks the supercharger with extra boost. I've done soem research and it seems to be very common mod for the XJR 6, with the ECU coping with the extra boost due to its MAF sensor.

Simply whipped out the radiator fans, untensioned the pulleys and removed the stock pulley and replaced. It definitely made a difference, so now I can pimp arounf sarf Larndan if my 350bhp living room.

You know it makes sense!

P.S. I also got round to painting the new dash for the truck, so I made some progress there too
#4
General Banter / Got myself a new daily!
July 02, 2008, 08:14:00 AM
MOT and car tax was due the start of this month on my daily (1994 XJ12 6.0 V12), and a fancied a change (though not too much of a change!), so I have acquired myself a new daily!

This time it's a '95 Jag XJR, ie a 325bhp 4.0 supercharged straight 6! Just got to tax it this week when I get the changed insurance through. It's done a whopping 68K miles, that's an average of just over 5000 miles a year! I'm also only the 3rd owner, and first owner had it for over 10 years. All the usual Jag refinements, in other words, lots of wood and leather. Amazing what you can get for under 4K these days!

I've already got my eye on easy subtle mods, such as a different diameter supercharger pulley to up the boost and power. I havven't got any pics of it yet (though it is outside my house, lazy, will do this week and post). It is very very similar to the library pic tho:

Edit: Pic of MY car!:


The supercharger does sound good! I know, I know, must finish the truck. Work seems to get in the way these days, and I'm going on hols next week too, Just not enough time ...
#5
I'm finishing work about 4.30, want to be getting away from South London about 6.30, and then off to Cornwall for some surfing Normally go about 3 times a year, first time this year!

We normally are in the pub by 10:30, promise to keep it under 120 on the M4 and M5!
#6
I thought I'd convey my attempts so far to tune my rebuilt big block with Edelbrock multi-point TBI based intake manifold. The ONLY result I'm aiming for so far is to get a reliable idle with a reasonalble AFR (Air Fuel Ratio), and be able to set the distributor base timing. So far I've had variable results ...

The new engine has bigger than stock injectors (to cope and supply with higher top end horsepower), so I have assumed I need to alter the ECU tune/map to at the bare minimum stop the idle from running way too rich with the bigger injectors. As such I have also installed a modified ECU with accompanying Moates Ostrich (V1) real-time emulator connected to my laptop running TunerPro. Also connected to the laptop and TunerPro is a USB ALDL diagnostic cable, and another USB cable to the WideBandCommander with wide band oxygen sensor installed, monitored by the supplied WideBand software.


As I said ealier, all me and my able assistant Dr Frank are trying to do at this stage is get a reasonable idle so we can finalise the distrubtor timing. I am using (an internet sourced version) of the AZFT standard bin as a starting point. I would rather use the Edelbrock chip that came with the Edelbrock multi point intake manifold coversion (which itself was a replacement for the stock 1987 ACLP chip) as a starting point, but I have never been able to get a 'good' reading of it. I obtained a duplicate chip from Edelbrock, and removed the chip holder from one of the two identical Edelbrock chips and put it in my Pocket Programmer (USB edition) chip reader/writer, but I've been able to read and re-verify the chip successflly. Also, what I have read seems to have some odd values when viewed using TunerPro. Therefore I decided to start with AZFT for tuning the new engine.

For the initial engine 20 minute break-in fireup, I didn't want to have extra computers involved, and didn't need idle as I was after 2000 rpm for 20 minutes to break in the cam. So I used the existing unmodified ECU (with Edelbrock chip) for the break in. As expected this ran way too rich because of the bigger injectors. Once break in was complete, I switched to the modified 'real-time emulation' ECU, with mixed results ...

The connectivity of the Ostritch input and ALDL output isn't as reliable as I would like. Every time I attempt to tune the truck in a particular session (e.g. an afternoon), the same pattern occurs. After turning the ignition to position 2 (run, but nor crank yet) I upload the AZFT bin to the Ostrich, verify, and emulate. This always works ok. Interestingly, if try to connect ALDL output before this, ALDL doesn't give any output until the bin is uploaded. Then I test the ALDL before cranking by pressing the gas pedal, and checking the ALDL dash of TunerPro registers the TPS (Throttle Position Sensor) change. This works ok too.

The ONLY variable I am altering in TunerPro is 'BPW Constant' in an attempt to get the ECU closer to reality with the bigger injectors. The truck will usually fire up and run, although the fuelling and ignition seems to be all over the place. In the first minute or so of running the ALDL dash gives all the info expected, TPS, MAP, RPM, 02 (narrowband) voltage, O2 cross counts. Also, if I alter the BPW constant and update immediately in TunerPro while emulating and keeping the throttle constant, the engine note certainly does change, indicating the emulating is working. Without fail though, after some time (not sure how long, a 2 or 5 minutes maybe) the ALDL stops working, and emulation changes seem to have no effect, even if I kill the engine, swutch back to off and to 2 again, restart TunerPro etc. While writing this post, it has occured to me that the only reason it all works again if I leave it all and come back the next day is because we disconnect the battery leads whenever we're finished at the end of the day. Maybe that is resetting something in the modified ECU.

Anyway, with the above setup, we can usually get the engine running, and idling eventually after it has warmed up. I must note that the running characterstic of the engine seem wildly different when cold and warm. There's no chance of it idling when cold, and then starting when hot seems difficult. Actually, the enginr running seems all over the place, sometimes it seems to be running and sounding great, other times it feels like it's missing cylinders, and the timing is all over the place. Using a timing light, we've had everthing from 60 degrees out, down to almost the 4 degrees it shoudle be at. Admittiedly, we keep having to move the distributor because in one position it will start but not idle, and another will idle but not start. The WideBandCommander I have installed is also showing massive swings in the fuel mixture all over the place.

I have also installed a MSD 6A ignition, but I disconnected it pretty quickly and changed back to stock to simplyfy setting the timing with a timing light. I'm assuming the modified ECU with Ostrich is working correctly, as it the engine does fire up with it connected, but really it's another variable that I'm hoping is 100% ok but of course I don't really know.

After a couple of now failed attempts trying to set the timing at idle, I'm open to suggestions and helpful hints. My current plan is to strip as much back to basics and remove as many possible red herrings as possible. I'm going to:

Change Oil and Filter again (probably a lot of petrol in it now)
Change the plugs again
Fit the new plug leads I have (been using a pre-rebuild set so far)
Readjust the roller rockers again
Put the dash back in again
Put the old ECU back in again AND swap the new injectors out and put the old smaller back ones in again

This, HOPEFULLY, will let me get the truck idling enough so I can set the timing and clamp it down to remove that as a variable. Then I'll put the bigger injectors back in and the modified ECU.

Even if this works, I still am a bit in the dark about getting any further with the engine tuning as it seems a bit all over the place. Hopefully with settled timing, tuning the igntion and fuelling will be easier, although the 5 minutes only of emulation control and ALDL output is a worry. Does anyone know if the AZFT is a good or reasonable place to start? Also, I think it might have open-loop idle (no use of o2 sensor at idle, run from tables only), but I don't know for sure, anyone?

Any and all comments, suggestions and help welcome!!!

#7
Yesterday I finally I had a real crack at tuning the new truck engine. Now, up to this point, I was never 100% sure that all this stuff would work, so it was time to finally find out.

As you may remember from my last post, I had replaced the stock ECU with this contraption:


Now, this replacement ECU is an ebay-bought / junkyard ECU from a similar 80's GM vehicle, so I had to just assume it was ok. Plus, me and Dr Frank had fiddled with it as necessary to get this tuning business to work.

First we had to desolder the original EEPROM chip holder, and solder in a replacement that a normal ribbon cable could be plugged into. Which meant pulling the ECU completely to bits, and going from this:


to this ...


to this:


Those pics are from the http://www.moates.net\" target=\"_blank\" rel=\"nofollow\">www.moates.net site, who sell a lot of the hardware needed to do this tuning lark, but you still have to 're-engineer' the ECU yourself. So it was me and Dr Frank who did very similar steps to those above. Actually we converted the spare ECU months and months ago, but it's only now that it was time to put it to use.

Now, neither my or Dr Frank's soldering skills are exactly world class, and you can see how much soldering and desoldering of intricate bits on a TWENTY year old fragile circuit board is necessary, so again, I just hoped for the best.

The black box taped to the ECU in the first pic is an 'emulator', which pretends to be the chip that was originally in the ECU, allowing me to change parameters using a laptop and TunerRT software.

You can see in the first pic that a ribbon cable snakes inside the ECU from the emulator box, it is plugged into the new hole in the ECu:


The other end of the black box has a USB cable that leads to my laptop.


Ok, now last time I fired up the truck with the new engine, I still had the original stock pre-build ECU sitting under the dash where it lives and connected. The truck ran like a dog as expected, as the new engine has much bigger fuel injectors than the original, as so was running wasy too rich, as the stock ECU doesn't know about the bigger injectors.

So, yesterday, I finally unglugged the old ECU, and connected the new cobbled together affair in its place. Now as I'm sure you all know, if the new ECU wasn't fully functioning, the truck wouldn't run at all, we all know that a burnt out 'brain' means an engine won't run at all.

I connected up my laptop using TunerPro RT software, and changed the FUEL CONSTANT from the stock 134 down to a much lower 92 to compensate for the bigger injectors, and 'uploaded' this to the black box of tricks.

Then, finally, we fired up the engine.

WOOHOOO!!! It fired up and ran MUCH better immediately, it was working.

Now for the really fun part.

With the engine running, I changed the Fuel constant on my laptop to a slightly different number. AS SOON AS I pressed 'ENTER' on my laptop keyboard, the engine idle note of the truck changed IMMEDIATELY to a slightly different sound.

REAL TIME engine manipulation by laptop folks!!!

Unforunately we ran out of petrol (and daylight) soon after, so we had to call it a day. I was also trying to get feedback data from the truck with an ALDL to USB cable at the same time, but couldn't get it working. I've realised today that I hadn't configured the right COM port, so hopefully I'll get it working next time. What THAT allows me to have, is a 'dash' on my laptop showing the current RPM, Vehicle speed, Throttle Position etc at the same time as being able to alter fuel and spark.

Also, I haven't fully wired up the WideBandCommander yet, which has another USB cable allowing me to monitor Air Fuel ratio exactly on the laptop too. I'll get that wired in this week, and next weekend we'll finish a few minor mechanical jobs like some vacuum pipes and dipstick, put in some more fuel, and we'll have a really good crack at getting this engine tuned to the point I can drive it to the MOT station (at which point after the tuning REALLY starts)
#8
General Banter / Built myself a rev counter!!
November 30, 2007, 12:31:09 PM
Though it may not look like you expect! I've been busy with the soldering iron and electronics spare bits box recently, so here it is in all its glory:


It's an amalgamation of various designs available on the internet, and should produce 1 Volt of output per 1000rpm for an 8 cylinder engine (adjustable to get just right). I'll hook it up to a microprocessor and attached Analog-to-Digitial convertor I'm working on:


These guts then sit behind the new console section I've constructed:


Which sits in the dash:


The display will (when I'm finished) display the RPM as a number, e.g. "2000 RPM"

Pics when finished :)
#9
Carrying on from the addition of the WidebandCommander Air/Fuel Ratio Gauge in my previous installment, I've made some more related dash changes.

The radio in an '87 Chevy truck normally sits at the bottom right part of the dash. In my truck this had already been moved to the (also custom) centre console, and a sheet plate installed where the radio was, with two rocker switches:


I have always intended to rework this panel to fit more into it. I need two rocker switches at least (for fog light, and a button for the WideBandCommander), plus I have on-and-off been working on a microprocessor system for the truck (see http://www.byvac.co.uk\" target=\"_blank\" rel=\"nofollow\">http://www.byvac.co.uk ) which can be used as an anti-theft device in conjunction with an ECU map/tune switcher, among other things. I haven't finished it yet, (some wiring and writing the program), but the peripheral hardware is finsihed. I wanted to install this, AND provide a USB point for the various USB driven devices I'm installing, i.e. the WideBand, also the ALDL stock ECU data feed, the microprocesser, and the Ostrick ECU Emulation device.

Ok, first make a template:


and


Cut out of sheet aluminium:


Bend the sides:


Now test fit the devices I'm going to fit, switches, USB hub, a data entry pad, and an LCD display:


And from the back:


Test fit onto the dash. Also here, you can see I've now fitted the Superior Customs rosewood dask wood kit ( http://www.superiorcustoms.com/catalog/CHEVY.GMC.1981_main.htm\" target=\"_blank\" rel=\"nofollow\">http://www.superiorcustoms.com/catalog/CHEVY.GMC.1981_main.htm ):


Now, fit some felt/foam to the aluminium frame of the new dash section:


Then cover with a piece of black vinyl, and fit the switches and data hardware:


I also double checked at this point that powering up the devices still worked:


Finally fit to the dash binnacle:


When I put the dash binnacle back into the truck, I'll at the bare miniumum wire up the two rocker switches, and plug the WideBandCommander USB into the exposed USB port.

More to come!!
#10
Ok, so in the last installment, I had successfully removed the stock dash instrument cluster from the truck. The stock instrument dash has a 'blank' pod that appears to be the same-ish size as a new gauge I want to install as a tuning tool for my new engine build, i.e. an Air / Fuel ratio gauge which is part of the WidebandCommander O2 kit I am in the middle on installing.

I had previously acquired an almost identical to stock instrument cluster from ebay, which also had a 100MPH speedo instead of my stock 85MPH one, which I intended to swap over as part of the A/F gauge installation.

I decided to take the ebay spare cluster to bits first, so I didn't have to worry as much about breaking it while taking it to bits as practice for the stock one out of my truck.

First then, take one ebay instrument cluster:


Unbolt the transparent plastic cover:


Unbolt the metal cover:


Unbolt the individual gauges:


Gauges on their own:


A closer look at the speedo. Fancy a bit of very easy mileage 'clocking' anyone? Don't trust an old-body-style odometer reading ever again! This is the 100MPH speedo I intended to use in my truck.


Ok, so now I knew taking the cluster to bits isn't difficult, so it was time to take the 'real' one from my truck to bits. Start again:


Take the transparent cover and black backing off:


Now, the black cover in the ebay cluster was a really nice pressed metal item. The one out of my truck is a horrible plastic one!! As you can see it has a 'blank' pod in it, which is just plastic. Rather than mess about drilling ot cutting it, I would use the nice metal one instead, as it already has a hole in correct place for the new gauge.

The rear of the cluster from my truck has an 'extra' set of connections at the back:


I had already guessed that these connectors are for the ECU in my truck as the first year (1987) of computer controlled TBI engines. The connectors are for the Vehicle Speed Sensor (VSS), which is tacked onto the previous year style speedometer.

Comparing the VSS-enabled 85MPH speedo and the non-VSS 100MPH speedo together:


The 100MPH speed doesn't have the correct backing plate for the VSS sensor, so I decided to leave it and keep the 85MPH speedo. Looking carefully here, you can see the VSS sensor is just a some form of light reflecting/reading device that counts the speedo spinning:


Ok, so on with fitting the new WidebandCommander A/F gauge. First I offered up the gauge to the metal backing plate:


It was very close in size, but didn't quite fit. After a LOT of messing around with a grinder and a file, I managed to enlarge the hole to allow the gauge to slide into place:


View from the back:


The metal backing plate is a nice snug fit for the gauge, which means it won't move about at all. Now obviously, the wiring for the new gauge needs to exit from the back of the instrument cluster so it can be wired in. So I had to cut into the back of the cluster:


I had to make the hole a bit bigger than in the picture in the end, to allow the illumination bulb of the new gauge to sit right. Now for a test fit of the cluster and metal plate:


Then I made a test fit of the front transparent plastic cover on top of that. Ooops! As the new gauge sits proud with its silver bezel, the clear plastic cover couldn't be bolted on top. No problem though, I just cut a hole in it, big enough for the gauge body, but not the bezel, with the idea for the gauge to sit proud of the cover when finished.

Cut cover:


Sit the A/F gauge in it from the outside:


Then slide through the metal cover (again, a snug fit to grip it well):


Finally, I can put it all back together!! A view from the back to see the wiring looms:


And the finished artlicle:


Now I can put the cluster back into the truck!! Pics to follow
#11
General Banter / Finally took the dash instruments out
November 09, 2007, 04:31:01 PM
First, remove the dash pad:


To show the dash shell underneath. I had to to this as I discovered that even after removing all the screws holding the instrument bezel in, it would only slide out upwards, which meant the dash pad had to come off.


With the instrument bezel now physically free, I had to remove the multi-plug, speedo cable, speed sensor, and illumination bulb:


Finally out! Mmmm, lovely 80's wiring:


Even nicer plastic circuit board:


I'm going to replace the empty dial in this cluster with the WidebandCommander Air / Fuel ratio gauge. Pics to follow when I do it!
#12
Only sort of, but there seems to be a bike story from everyone else, and I didn't want to be left out

The truck's dash has one spare (blank) gauge pod, which is perfect for the Air/Fuel ratio gauge that comes as part of the WideBandCommander kit I am fitting to help tune the new engine.

Also, I got hold of a spare full instrement bezel and all the gauges on ebay a while back, mainly because the ebay one has a rare-ish 130MPH speedo, which I want to replace my stock 85MPH one with.

Anyway, that was all fantastic in theory, but in practice, I got as far as removing the outer bezels with a screwdriver, and then realised I needed a 6 mill spanner to get the unit out. Which I didn't have with me. Never mind, next time!


Actually, I didn't mind, as I only went up to the lockup to parkup my bike there. It hassn't been getting used much in the last month, and I don't like it sitting outside on the estate doing nothing and not moving for too long. Especially as I live on the 5th floor of an ex-council block in South London. No, really!!

So I've parked her up with the Chevy factory manuals and knackered old engine block out of the truck


Tidy
#13
General Banter / She (almost) lives!!
October 11, 2007, 10:44:29 AM
Me and Dr Frank finally couldn't put it off any longer, and had a go at firing up the truck last night.

It had took us a while to get the starter motor working first, as it wasn't engaging at all. After some head scratching and placing it on the old block to see where we were going wrong, we figured out we had put it on upside down! Ooops. Once the right way up the engine turned over.

Topped up the engine oil, put water and antifreeze in the rad, power steering fluid in the reservoir, and plugged the ECU brain back in beihind the glovebox (had been removed to fiddle with it, and ensure starter motor test didn't attempt to start the engine).

Finally put some the old leads from the old dizzy on and checked all the plugs were tight. I have a MSD Blaster box to mount and intstall yet, but for firing up the engine, standard will do.

We couldn't seem to get the engine going initially no matter how we fiddled with the base timing, untill Dr Frank had an inkling that the dizzy was in 180 degrees the wrong way round. We quickly moved all the leads round on the dizzy by 4 and tried again. It burst (briefly) into life! At which point we realised the both the petrol tanks were empty and the daylight was dying.

So today, I have juiced her up with 5 gallons in each tank, bolted on the exhausts, and took the leads back off again. We're off out in a minute to remove the dizzy and rotate it 180 degrees so the leads can be put on in their natural places, and we'll try again. Will let you know how it goes later!!
#14
General Banter / Update on my engine rebuild
September 25, 2007, 05:52:44 PM
I thought I'd post some more pictures of how my engine rebuild has progressed, which is now literly a couple of housrs away from the fire up party.

Here's the March Pulley Serpentine system taking shape


Then I got the correct A/C compressor to fit, and added some new rad hose


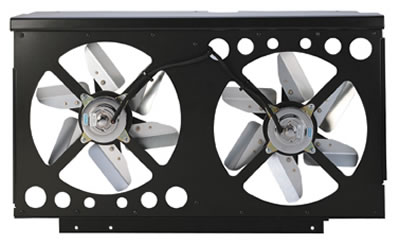
The stock rad shroud and viscous fan has been junked for a heavy duty PermaCool twin electric fan setup


Had some silly little bits left to do, such as put the power steering / hyrdroboost brakes reservoir somewhere. The March system assumes an in-reservoir p/s pump, but the 454 1-tons have a separate high capacity reservoir due to the shared steering / brake duty, plus the pump itelf has the normal high pressure port and return, but also has an extra low pressure return and the pipe to the reservoir.

I had to put it somewhere so made up a simple bracket


and fitted it to an existing intake bolt


Also finished the wiring and fitted the new battery. Just need to put some HT leads on it, and reconnect the computer and TPS and MAP sensors, and fire it up. We tried turning it over, put the new starter motor didn't seem to connect to the flex plate. We'll have another look at it next time we go down to the yard, because I'm not leaving next time I go there until it's running!!
#15
General Banter / A few more pictures
September 16, 2007, 09:58:05 AM
I know I should really have it running ny now, but we did make more progress again yesterday. All the hoses have now been completed, including water and power steering oil (which had 2 returns, 1 high pressure, and 1 resovoir pipe). I do still have to make up a bracket to hold the resovoir in place:


The replacement electric fans instead of the stock clutch fan and shroud is also now in place:


The earth and power cables to the starter motor are also now replaced with new ones. All is really left to do is put some new spark plugs in it and fire it up! (Plus a few little more things, of course!)
#16
General Banter / Got two vehicles back on the road at last
September 13, 2007, 07:09:37 PM
Yesterday morning I was down to NO working vehicles, with the Jag out of action with a blown heater hose and no coolant, and the bike, although freshly MOTd had a duff battery!!

So yesterday evening I picked up hose, clips, anti-freeze, and a new motorike battery from Halfrauds. This morning I had to fill the new battery with acid and fit it to the bike. I was slightly worried the new battery was a little larger than the old, but it fitted fine. So I finally had transport to work!.

I've also replaced the broken Jag hose:


with some generic heater hose that seemed about right. It's a straight piece rather than the original which has a slight bend, but it's so short it should be ok I hope. There is a very slight kink in it on one side, but it certainly isn't pinched or collapsed:


It's got two chances!! I've given it a good rag around the block and it seems to be still attached and not leaking. Fingers crossed.

Now to do some truck this weekend!!
#17
Fiddle-arse, gonna have to get up early tomorrow and get the train to work. Someone at work asked today 'How's the Jag?' (my daily driver), to which I replied 'Yeah good, it hasn't played up for weeks and week'.

Well that was the kiss of doom of course ...

Luckily after the 30-odd mile drive was almost over, and I was only a mile away from home tonight, I stopped at some lights, and a woman and her kid were pointing at the Jag from the pavement, which is when I noticed a huge plume of smoke/steam coming from the bonnet:


Thankfully it isn't a *huge* problem, as the hose that has developed a hole in it (don't know how, but it has), is just a simple 6 inch piece of heater type hose held by two jubilee clips, so it should be easily replacableable. Whether I can get the c*cking thing off is another matter, one of the clips is a git to get to ...

Might as well go collect the bike from it's MOT tomorrow night, I was gonna wait till the weekend, but I need transport!!
#18
General Banter / Edging closer ...
September 09, 2007, 01:36:41 PM
... to completion of the truck rebuild. *Still* not there yet, but getting closer. We drilled out the alternator bracket to allow the new bigger bolt through it. Also got one of the belts on and started looking at some of the starter motor wiring that needs to be replaced. The main thing was getting the reconditioned radiator back in, and new water hoses on as well:


Dr Frank is lurking in this pic:

#19
General Banter / Over my dead body
September 05, 2007, 06:24:06 AM
#20
General Banter / Dayco ribbed serpentine belts?
August 20, 2007, 07:40:08 PM
Does anyone know where I can buy some of the above in the UK, so I don't have to order them from the US?

I finally got the A/C compressor mounted, and the two belts check out as they should be, one of 47", and one of 59.5"


Once I get the belts on, I can throw in the radiator, fan, and coolant hoses and fire it up!
#21
General Banter / Quick update on rebuild
August 05, 2007, 09:47:17 AM
Finally got the new pulley system sorted on the truck engine rebuild. The power steering pump I was worried about was no problem, and actually the air conditioning compressor which I thought would be fine needs a bit of modification instead. You can never tell!! Getting there tho:


More as it comes! I'm gonna get this thing back on the road if it kills me ....
#23
As some of you may know, two weeks ago I wrote off my daily driver '94 Jag XJ6 4.0S in a death-defying 70mph 180 degree spin across 4 lanes of the M25 after driving through an oil/water/foam slick caused by a burnt out vehicle.

Which seeing as both the Chevy pickup and my motorbike are also off the road at the moment left me with no daily driver or transport!!

So! I have acquired myself a new daily driver ...


Yes, it's another Jag!! 75,000 miles on the clock means only 5000 miles a year for the last 14 years, full service history, full leather interior. Oh, and this:


Ahh yes, that'll be a 6.0L V12 shovelled under the bonnet, rated at 308bhp @ 5350rpm, and 355 lb/ft @ 2850rpm

I reckon it makes the new daily a bit of a sleeper on the quiet!!
#24
General Banter / Whoopsy!
July 09, 2007, 07:17:26 AM
Oh dear. Was on my way home last night from a mate's house, on the M25 in the Jag, coming up to the M4 exit.

Was doing 70 in the 'slow'lane ready to pull off left onto the slip exit (which is a long slip road).

There had been a previous incident of a vehicle fire on the hard shoulder, with the burnt out vehicle being loaded, but leaving a large wet greasy patch leaking onto the slip on an otherwise dry road.

I took the slip road and went over the greasy patch, and the back end broke away to the right, and then back to the left.

Then me and Jag did a slow 180 pirouette right across 4 lanes, and we ended up facing the wrong way buried in the crash barrier of the fast lane.

I'm fine, but it has stoved the Jag in down that side. I even drove it home, but waiting for insurance to write it off!!


Never a dull moment, and could have been a LOT worse, how I didn't hit anything and nothing hit me I will never know ...
#25
General Banter / Perma Cool has arrived!!
July 06, 2007, 10:00:30 AM
The rebuild continues!!

I ordered a 'replacement' for the old propeller fan that was bolted to the old water pump and plastic shroud, in the form of a bolt in electric fan(s) arrangement.


Ordered it from summit, but with cheapo surface delivery, as it is quite large!! Still only took a few weeks to turn up though. It appears to be *very* well made, and allegedly is a straight bolt in replacement using original fitting points.

I'll take some pics this weekend, after I have another go at fitting the exhaust headers. They needed a bit of 'adjustment' as they were fouling on the larger than stock head bolts of the new block. (I adjusted them with an angle drinder to the delight of my neighbours on the 5th floor )

Should have quite a bit bolted on this weekend, and I'm taking away the radiator to be recored while I'm at it.

Pics soon!!